Reviving a Dead Macintosh Classic
For the past few years, I’ve had an empty Macintosh Classic shell on a table behind me in my home office, the result of a Macquarium project of mine from 2000. And people love it! During video calls it always made for a good topic of conversation.
But people were always disappointed it wasn’t a real working Macintosh…and truth be told, so was I. So what to do? Get a working vintage Macintosh of course!
It turns out there is a lively market for vintage Macs, with working capacitor-refurbished models commanding a few hundred dollars, some complete with SD card hard drive replacements to give silent mega-capacity. There are also plenty of stories of folks coming into them for free from friends or family, but no such luck for me. Like many collectibles, people either know what they have and try to get top dollar for it, or don’t know what they have and therefore don’t offer them for sale in the first place. I focused on Macintosh Classics as I already had a mouse and keyboard for one (from the Macquarium project), and they’re one of the most recognizable since they were so popular in education due to their lower (sub $1000) price point. I decided to take a risk and purchase a non-working one and see what I could do with it. A very common issue is bad capacitors, and since I’m familiar with replacing those, I hoped it would be that simple. Spoiler: it wasn’t.
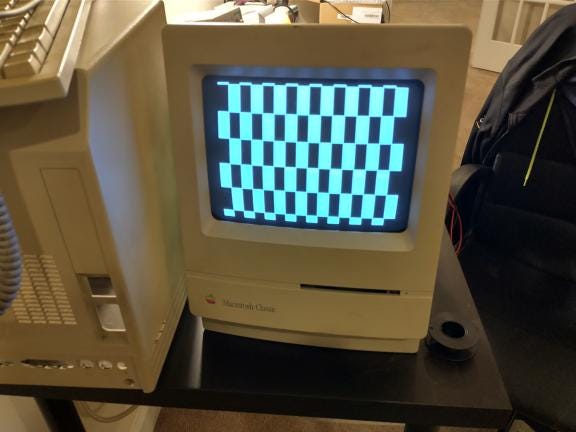
It arrived, in good external shape, and the date on the case stated production was in April 1991. Wonderful! But the first problem: there was clearly something rattling around inside the case. I hooked it up and the screen showed a checkerboard pattern. Some research indicated this happens when the processor can’t load the ROM into RAM, so its often due to bad memory…so first order of business is to pull the memory-expansion daughterboard to see if that might be the cause. Upon opening the case to do so, I discover what had been rattling around: the battery and the battery holder. And they looked horrible. This was the aftermath of the ‘Maxwell bomb,’ wherein the Maxell-brand PRAM battery exploded, spreading battery acid on everything and generally eating through the logic board. The metal railings of the chassis showed the corrosion of the battery acid as well. Removing the memory daughterboard changed the checkerboard pattern to have thicker boxes but was otherwise very similar; some online forum postings suggest the checkerboard is the video chip is looping through all the RAM, so this display change is explainable by the change in the amount of memory available.

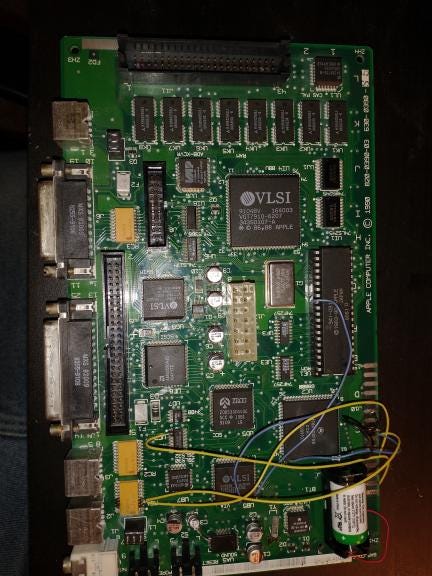
Examining the logic board, the battery left a lot of gunk the color of rust on the board. I cleaned it up as best I could, unfortunately not remembering to take a picture beforehand. The traces looked okay, but some of the vias (the solder points through the 4-layer board) near the ex-battery looked suspect. Before doing anything drastic, I decide to replace the electrolytic capacitors on the logic board and the analog board as Occam’s Razor says they’ve likely failed and were the source of the problem (Spoiler: they weren’t…at least not solely). Along with the capacitors, I also ordered a new PRAM battery and battery holder.
A few days later, I had the new capacitors in, the power supply on the analog board was testing at a good full +5v/+12v, but the screen was still showing a checkerboard. I got a little forceful with one capacitor and pulled up a pad, a reminder to never rush these things, but a quick jumper to the connecting pin on the sound chip took care of it. As the board was still pretty dirty, and the added flux for my capacitor work just made it worse, I put it in an overnight vinegar soak and then ran it through the dishwasher. But afterwards, the screen still had the same checkerboard.
At this point all the easy stuff was ruled out, and normally I would have given it up as another failed project…but my mind kept going back to those suspect vias. So I downloaded the Bomarc schematics from archive.org and set about the painstaking task of testing individual traces. I also thought perhaps the clock circuit might have been broken, so I hooked up a frequency counter to the Y1 crystal — which promptly fell off the board. I suspect the battery acid had weakened the connection, but it was a quick fix to reconnect it.
Checking traces ended up being exactly the right move. It turned out one of the address lines between the processor and the ROM was broken. I soldered in a bodge wire (a thin jumper wire to repair a broke trace) using some 30 AWG wire and gave it another try. Yay, the screen was different! Instead of the checkerboard, it was the standard Mac “raster screen” background. This indicated the processor was able to load the ROM and start executing code. But still, there was no startup bong or mouse.

Some more research indicated that the ROM code does the bong sound very soon after initializing the screen, so my next thought was that something was wrong with the sound chip. All traces tested fine there. As the sound chip is accessed through the 65C22 VIA chip, I concentrated further circuit testing there. Sure enough, the read-write line and one of the data lines between the VIA chip and processor were bad, the product of two more failed vias. Two more bodge lines, and voila! She booted!

FYI— the Bomarc schematic has the wrong pin numbers for the ROM’s data lines; fortunately it was fairly easy to determine the pattern from the other working lines.
It turns out this Mac Classic had System 7.1 installed. From the files on it, was a lab computer from Bowling Green State University in Ohio, and taken out of service sometime around Fall of 2000. I can totally believe this machine was on almost everyday for 10 years, and then in storage for twenty years since then. It has a smattering of half-complete Word 4.0 documents for various undergrad western civ, french, and sociology papers, so its a fun peek at late-90s/early 2000s academia.
Trying to actually use the machine revealed the floppy drive was filthy; something in it was destroying disks (and these are a finite resource now) so I ended up taking the floppy drive apart to deep clean it using this video as a guide. Seeking to avoid “sneakernetting” with floppies over the long term, I tried to “network” the Mac Classic to a Linux box using a null model cable. So I grabbed a terminal software package from macintoshgarden.org, used Linux’s hfsutils and a USB floppy drive, and copied it onto the Mac Classic. I then soldered together a null model cable and configured the Linux box provide a login on the serial port with agetty.
At this point I discovered the circuits for powering some of the serial port pins also had their vias destroyed by the leaking battery. A few more bodge lines later, serial is working, and now I have my very own little BBS-like setup for the Mac Classic. I’m able to transfer software packages directly using the old school sx, sb, and sz UNIX commands, and can even simulate dial-up Internet via pppd or slirp if desired.
Its been fun getting this old workhorse up and running again, and it definitely feels good saving one from the trash heap. I’m now tempted to find other non-working vintage Macs to work on — perhaps a SE/30 or a Color Classic. I’d also love to get my first computer again — a Tandy Color Computer 3 — though I doubt it would garner the same reaction in the background of my video conference calls. Nothing else has quite the same place in our collective tech hearts than an old school Macintosh.

